 |
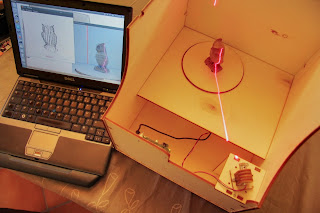
| The fabscan is cheap... and buggy, but it can be made to work. In its state, I would recommend it only to tinkerers, or after a few improvements (easy to make since it is opensource). |
And it proved to be cheap, in all the possible ways.
In my opinion, the most annoying thing was the totally unusuable FabScan Ubuntu Live CD software.
This post is mostly about how to get it to produce an STL with the Ubuntu Live USB distribution specifically made for the fabscan.
In short: I just was not able to get a STL file with the existing setup. Still, I found a workaroud to get scans in the end. How? Once booted, install imagemagick, start fabscan, calibrate the thing properly, scan, export the PCD (3D point cloud), and use meshlab to finalize the process (compute the triangular facets and save as STL).
This howto was first written for myself before I sold it when I was satisfied with my curiosity. I release it here both for my buyer (!) and for other people that it may help getting something out of the hardware. May be I am dumb or what, since the forum is not filled with people complaining about it! May be the other platforms are better.
Basically, the latest USB live for Ubuntu does not work (version 100.9): it lacks some tools, and the provided software is really not professional. It is slow also. OK, enough ranting as it does scan in 3D, and it gives a good ground for further improvements, both software and hardware.
I will not speak a lot about the results since I did not use much and have no real point of comparison so far. With proper calibration I think that you get a shape that resemble the scanned object (...). Some shapes are easy to scan, but those with a lot of concavities just cannot scan, and this is not the fault of the fabscan, but of the technique that is used.
Installation
I downloaded and flashed a USB drive with the latest Ubuntu live from the official website here. This is the usual procedure to flash a linux distribution onto a USB drive. This operation is made trivial thanks to the excellent unetbootin.
But when I tried to use the "fabscan" software from the distribution, I was able to scan but it was not possible to generate a valid STL file. It was even not possible to save the point cloud for indirect processing as we will be doing below (it was empty, no error message was displayed).
Actually I was partially able to understand why it failed by launching the "fabscan" command from within a console, and NOT by using the main menu that just hides all the issues. For example, it looks like that this special ubuntu distribution was compiled without "imagemagick", but fabscan was expecting it (what the heck?). Since fabscan just tests absolutely nothing seriously, it is almost impossible to tell why it is not running properly from the interactive mode. This is a really very bad programming pratice by the way, never trust this kind of programs.Too bad to ruin the whole project with a piece of software that mainly "puts together" calls to other programs.
Fix: keyboard layout (only useful for the subsequent fixes!)
So first of all, close all instances of fabscan, and open a terminal by clicking on the big top left Ubuntu icon to open the launcher:
Change your keyboard layout (optional):
If and only if you are NOT using a US keyboard, you will want to type "sett" and click "System Settings", then "Keyboard" in the Hardware section, and click "Layout Settings" in the bottom of the panel, click "+" at the bottom and add your keyboard layout (eg. French). Now remove the "English (US)" layout (select it and press the "-" button). This way, your keyboard will be configured to your layout and it will be much easier to type subsequent commands in the console, or to specify names in the applications dialogs. Close the setting panel once done.
Fix: install imagemagick
Now, once again in the launcher (top left icon), type "ter" then click to run "Terminal", as in the next picture:
Within the terminal, you need to upgrade the installation which is incomplete for fabscan to work properly! So type "term" then <Enter>
sudo at-get install imagemagick
I guess imagemagick is required to analyse the pictures taken by the webcam and process its pixels to get the laser line, but I am not sure and I would not try to read the source code given how badly it is programmed in my opinion (sorry, but seriously, the software quality is bad...).
3D scanning with fabscan... and meshlab
Select the hardware
Anyway, now, you can run "FabScan" (the teddy bear icon on the top left of the screen). It will start to blink, and you should wait until the windows opens.Now power the 3D scanner, then plug the two USB cables to your computer: there is one for the Arduino, and another one for the internal logitech Camera.
From the menu bar, select "SerialPort" menu and select "ttyACM0" which is the serial-over-USB line if connection was sucessful. The laser should quickly blink (which probably means that the Arduino is correctly connected).
Do the same for the "Camera" menu: select the "UVC Camera (...)". The software may pause for a few long seconds.
OK, now, both menu should show a tick mark in front of the two required hardware entries.
Control panel and calibration
Now i n the "File" menu, open the "Control panel". You should get a view of the camera, with the laser line visible.If you never did it, you may have to focus the webcam with the small outer ring, until you get the sharpest picture possible. Use an object for this, putting it where it will be scanner. There is always a tradeoff but you should get a good result by putting an object in the middle of the platform. The larger the object the more blurry it will become on it closest and furthest extent.
Idem, make sure the laser itself is focused to the thinnest line. It depends on your "line laser" but it will generally be the matter of rotating the outer ring also. This will probably rotate the whole laser line, which is not what we want.
So slowly rotate the laser until the line is perfectly vertical (and focused!). This can be made by aiming at the corner of the inside enclosure (not that safe), or by translating the window off screen to the left or the right until you are able to align the laser line with the screen border, like this:
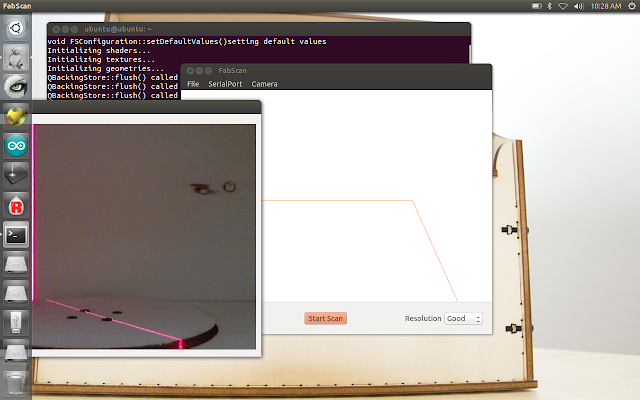 |
| See the highlight on the left? I calibrated the line laser verticality by means of the screen border. |
Now, check the "enable" label below the "Turntable" section on the left of the "Control Panel" window.
You want to align the laser left or right, so that it passes exactly in the middle of the rotation plate. The easiest way for this is to stop looking at the screen but look at the real box: use the two screws of the plate as reference point, and the left and right arrow of the software interface while you rotate the laser mount manually, horizontally in the 3D scanner enclosure (do not rotate the laser itself, but the whole support in its circular plug).
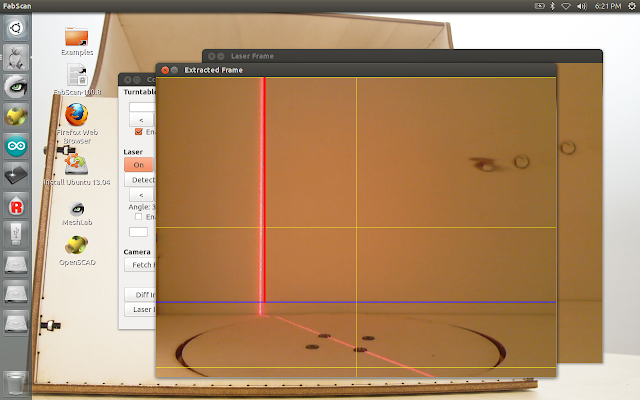
Now, you can "Detect Laser" to have it compute the proper angle, and to make sure everything is working fine. Idem, do a "Fetch Frame" to know. Once properly aligned you should get a view that look like this:
documentation).
It is ot eough to translate the bed up on the stepper motor axis, and/or adding some bits of paper in the wooden hole itself. The hardware design does not seem to provide any way to tune the webcam height or angle, so I don't see how I could get up to this calibration:
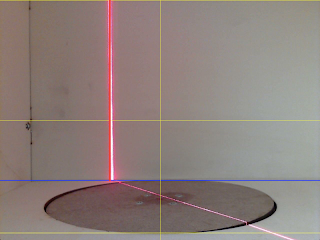 |
| Official calibration. My laser is more vertical but I just cannot see how I can get the two horizontal lines matching the bed. See also how badly horizontal the bed is? This plywood sucks. |
Now put your object on the middle of the platform, and close the control panel.
Usage... and fix to get an STL file
Select your resolution. Note that "good" already takes ages, but that the lowest resolutions is useless except for debugging. So be prepared to do something else while it will be scanning!Once you start the scan, the laser will blink once between each frame, while the platform rotates. Dots will start to appear on screen as the process goes by. Note that I am almost sure the thing could be made 10 times faster, at the very least. This beast is really slow, but well, it is cheap ;)
Once the scan finished, you are stuck with the existing software!
The documented "export STL" option never worked for me, which is easy to guess when the "STL export done" popup appears immediately (I said it: no test is done beneath the interface, how ugly...). The software also wants to access some macintosh folders for some unknown reasons in a Ubuntu distribution, ie. the distributed USB image probably was not tested much.
So we have to revert to command line, which is always an option on linux and generally saves your day when the mouse is not enough...
For that, you first need to save the collected 3D data points to a "PCD" file. Use the "File" menu to do so and "Save PointCloud" it as an easy name, like "cloud.pcd". Better save it to where it tells you, ie. the home directory of the current user. No need to make it more complex since you are on a USB key anyway and it will save nothing when you reboot...
To generate a mesh of triangles that you can work with, you can head to the "powercrust" and "orient" utilities that are provided on the DVD, but that are badly interfaced (eg. bad assumptions that I am on MacIntosh, doh). I found it faster to flee away from fabscan and to process the cloud of 3D points with the outstanding Meshlab (it is outstanding both because it can do a huge number of 3D operations but also because it crashes all the time whenever I used it for the last year at least... so frustrating!).
In the terminal, run this to convert the cloud points to a format that meshlab can process:
pcl_pcd2ply cloud.pcd cloud.ply
Obviously, use the proper filenames and do not override the source file with the generated PLY file!
Then start meshlab, from the side panel of Ubuntu and open your "cloud.ply" file.
Compute the normals at the scanned 3D points via the menu (just use the default as a first try):
Filters > Normals, CUrvature and Orientation > Compute normals for point set
Once computed, Meshlab has enough info to find the triangular facets of the point cloud:
Filters > Point Set > Surface Reconstruction: Poisson
From the toolbar of Meshlab, you can change the view to show the facets. When OK, just do a:
File > Export Mesh As ..
and select STL as your file format.
Improvements
Here is a list of things that could be improved somehow easily, especially with a 3D printer.
- design a more rigid bed, eg. by adding three pairs of rollers to constrain it to be horizontal. By the way, I used the line laser rotated 90° and pointing to its edge to check the horizontalitity as it rotates during the setup. In the current design, it is almost impossible to achieve a rotation in a horizontal plane.
- provide something to Z-leveling the rotating bed (it is not obvious in the existing design).
- use better plywood than what I had or add a metallic skeleton. The box I got was neither flat nor square, and I guess it may impact the 3D scan negatively in the end.
- add bolts to set and secure the position of the laser, since the cable is ometimes enough to move it out of its carefully chosen direction. Idem for the camera
- re-write the full software in Python, no need for a compiled language here I think
- re-do the whole distribution, or just drop the idea at all if it cannot be made self-sufficient. This is a good idea, but it is completely counter-productive in its shape because the "fixes" need to be appliead each time the OS is booted on the USB stick!
- understand and use the point cloud library instead of Meshlab so as to automate the full process to get an STL file. This was the goal of fabscan but it failed for me. There is also the interesting "powercrust" and "orient" tools but fabscan fails because it tries to access some weird Mac folder before calling them, which results in undetected failure (Mac directories on a pre-compiled linux distribution? what the heck?).
Finally, here are a few links:
Update: for Fabscan running on Windows, you may need an updated Arduino sktech. You can check the work made here at Labsud (in French).
Update: it would be wise also to follow also Mark and his nice work on the UI and a debian package.
Technical details (re- code source)
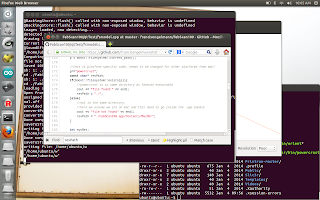
Below, one of the issues is explicitely commented by the author in the source code (click to enlarge).A better practice would be to check here for the Mac folders first, and defaults to the generic approach otherwise and not the opposite! With the Fabscan Ubuntu key, the "powerscrust" and "orient" tools are already in a usual binary folder, so there should be no "./" in front of the path to them: it requires that the commands are in the current folder, which they are not!
By creating a Mac-like path starting from the home directory, the software moves on further until it geerates the "final.off" file, which it fails to read back (and source code probably needs to be modified from this point).

